The RAW photo file format differs from the standard camera photo file jpeg format which has your photo processed within the camera itself which for the most part provides a somewhat substandard and compromised version of your digital photograph.
Here is an abbreviated example of what the eventual workflow looks like from within Lightroom.
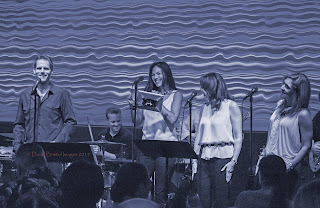
I'm using an image where certain elements of the original photo could use a little bit of selective color correction.
There are plenty of techie reasons as to why the original photo is so dark and that basically has to do
with there simply is not enough light.
In this case I wanted to adjust the skin tones on vocalist Darelle and also on drummer Brad's face.
Darelle's face and left arm has some extra colored lighting cast from her iPad's lcd screen that is adding a slight amount of blue.
Brad's skin is over saturated from the red stage spot lights.
The desired end result is hopefully closer to what the actual flesh tones really are but without allowing the end result to appear too artificial.
Click on the photos to get a manual slide show you can use to see the changes as they are applied in the editing workflow.
 |
| Straight out of the camera RAW photo file without any processing. |
 |
| Exposure correction added |
 |
| Flesh tones corrected on Darelle's upper body and Brad's face |
 |
| Darelle's facial skin tones corrected further |
 |
| Entire image exposure corrected up for end result |
 |
| Unedited original RAW photo for before and after comparison. |


