Tuesday, September 25, 2012

Evergreen State Fair 2012

Went to the Evergreen State Fair with the family in August 2012.
Main event was the Alaskan Pig Races followed by the Lumberjack Show.

Lots of fair food on a super beautiful summer day here in WA state.

The Evergreen State Fair is not the state's largest fair but as such it has a small town flavor
without the crazy crowds and all that entails.


Large Woodpecker

Heard this rather large Woodpecker at work
in the greenbelt behind our property.

The sound of his rapid pecking was very much like
 a loud air powered ratchet wrench.

I'd estimate this bird's body to be close to the size of
a large seagull. He was situated about 50 feet above me
and I used my longest lens to capture these images of the ugly beast.

Looks like the type of woodpecker used as the basis for the cartoon character
Woody the Woodpecker.

Notice the amount of damage he was able to do to the
wild cherry tree.


Sunday, September 23, 2012

Speaker Reconing

My first attempt at reconing a speaker.
This speaker is a 12" Celestion G12M from 1969.
This is a Pre Rola build which is considered the
holy grail of Celestion types.
I believe brother Chris has one similar  to this in his Fender Tweed Pro amplifier

I purchased the speaker recone parts for $35.
The most difficult part was the removal of the old speaker parts
from the frame and the cleanup of the old adhesive.
Lots of acetone was used.

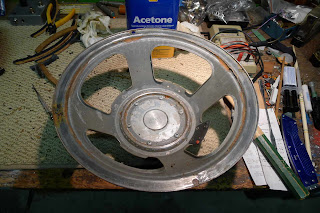
Here is the speaker frame after an hours worth of cleanup.
Note the voice coil slot is taped over to prevent "stuff" getting trapped in the voice coil magnet gap.
Here is the original speaker cone with spider and burnt out voice coil assembly.
Temporary 0.005" shims are installed for the voice coil gap. These shims will keep the entire new speaker cone with the voice coil and spider alligned relative to the voice coil gap and speaker frame.
These shims are made from some type of paper stock and plastic shims would be better.
 Sticky black speaker cement that gets tacky in about 10 minutes.
Sets in 24 hours. Notice the new speaker cone, voice coil and spider assembly in the background
 Adhesive is applied for the spider
 Adhesive applied on the outer edge of the speaker frame for the speaker cone
 New cone assembly slipped down in position over the shims .The shims are doing their job keeping the voice coil centered within the magnet slug.
 More adhesive applied for the cork gaskets
 All cork gaskets in place
 Dust cap glued in place. A small handle made from masking tape was
made to assist in positioning the cap on the ring of applied adhesive.
An empty shot glass was used to weigh down the dust gap while the adhesive sets
After letting the adhesive dry for a day, the speaker tested out great.
Mission accomplished. Pretty simple actually as long as you have the work flow
figured out ahead of applying the adhesive.

Monday, March 26, 2012

Candy Green Strat Refinish Process


Here are photos showing the process of refinishing a Fender Strat style guitar body with a
candy apple green nitrocellulose lacquer.

 Original black paint job on mahogany body

 Using paint stripper to remove old paint

Plugging old holes that will not be used

 Neck mounting holes were way off so the old ones get plugged and correct holes
can be drilled
 The old string through body holes are now plugged
 Routing out the side jack so it can be plugged with a block of mahogany.
A standard top mount jack plate will be used instead of the side jack.
 Plug of mahogany is fitted into the routed body
 The plug has been shaped and the old screw holes plugged with wood from old q-tips.
 The neck plate shape was not correct so a mahogany plug was inlaid
in order to get the shape corrected.
 The plug after it is shaped to the correct form
 The neck mounting plate now has enough wood beneath it under the lower left corner.
Prior to this correction the metal plate corner protruded out from the edge of the guitar body.
 The pocket for the Kahler tremolo assembly is routed out for a better fit.
 Initial wood removal for the top mount jack plate.
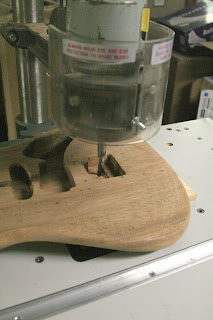
 Top mount jack plate hole is routed out using a pin router table.

Fit check of the components prior to applying the wood pore filler goop.


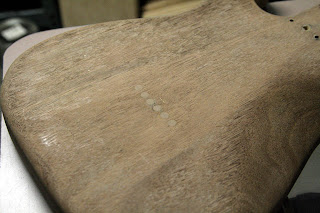
Initial application of the wood pore filler. Note the color of the filler has had aniline dye
mixed to match a color appropriate for the mahogany.


 Guitar body hung out to dry for a few hours prior to wiping off the excess pore filler.


Clear lacquer coats applied over the pore filled body.
See how the pore filled wood grain has a nice contrast against the mahogany.


Primer coat is sprayed over the body after the clear coats were sanded smooth.

 Final coats of primer eventually cover the mahogany well enough to move on to the next
step of applying the gold  metallic candy undercoat.

First coats of the gold candy metallic.
 This photo shows the gold color most accurately.
 A few coats of clear nitro lacquer are applied as a guard coat prior to applying the
green color coats.
 Initial coats of the green over the gold.
The final color is achieved after 5 coats of the candy green are sprayed.

After this the body gets a good number of clear lacquer coats applied over a couple of days.
The clear coats are lightly sanded between coats if needed to remove any dust or runs.

The guitar is now given a few weeks to allow the lacquer solvents to out gas prior to giving the
finish a wet sanding session using sandpaper from 800 grit all the way up to 2000 grit.

I use soapy water or mineral spirits when I wet sand to keep the paper from gumming up with lacquer particles.

Here are shots of the assembled guitar after the finish gets rubbed out using a few Meguiars
auto finish polishing products.